
Stage 16 · Bring the practical details together
Finishing touches for your campervan conversion
You do not need expensive decoration to make a van feel finished. Neat edges, useful window coverings, comfortable handles and a few carefully chosen fittings can make a simple build easier to live with.

1. Walk through the van before buying more
Try an ordinary evening in the parked van: put down a cup, charge a phone, cook using an already commissioned installation, change the bed and put a coat away. Write down the small things that get in the way. A missing towel hook may matter more than another decorative panel.
Split the list into work that affects safe use, work that affects everyday comfort and optional decoration. Resolve loose furniture, sharp edges, leaks, obstructed access or system faults first. Decorative work can wait.
Look at the van in daylight and with its normal lights on. Keep a small group of materials and colours that already work together. Repeating the same trim finish and handle style often looks more considered than adding a different detail to every cupboard.
2. Template and fit trims without covering a problem
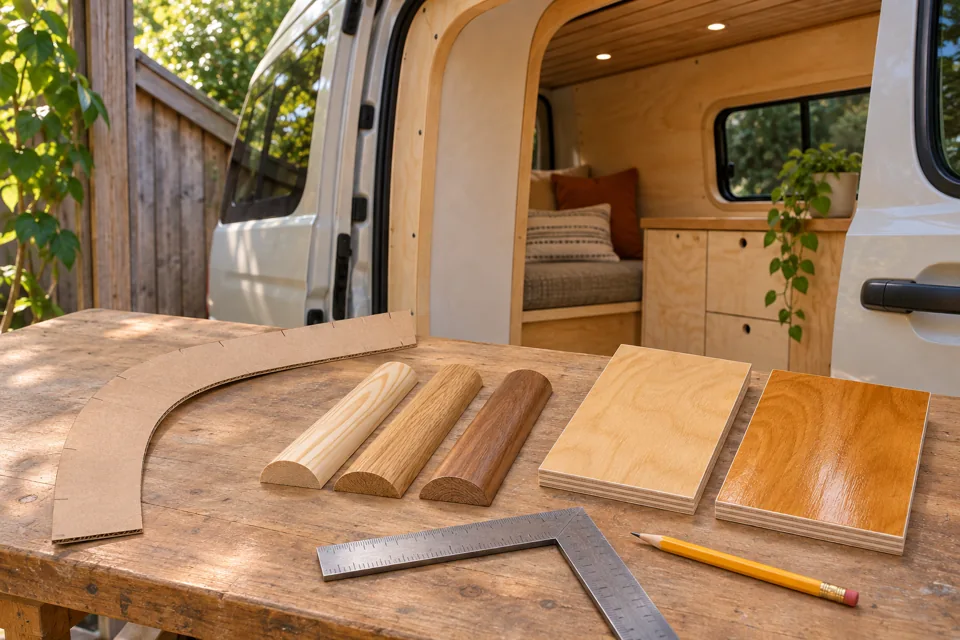
Use cardboard templates at corners, door surrounds and changing curves. Mark the face and orientation of each piece so a promising shape does not get transferred backwards. Trial-fit before finishing and work from the actual opening rather than assuming the two sides match.
Check that trims cannot foul a latch, reduce a door opening or create a sharp edge where someone climbs into bed. Where an edge needs protection, select a suitable trim profile and fitting method for the actual material.
Before adding a fixing, know what is behind it. Use the vehicle guidance and recorded service routes to avoid hidden wiring, pipes and restricted vehicle areas. Do not screw blindly into a pillar or roof rib just to hold a decorative strip.
Make covers over service areas removable where access is required. A visible screw or tidy removable panel is often a better choice than an invisible fixing that makes the next repair destructive.
3. Choose a finish for the material and its use
Make a sample of the actual plywood, timber or panel finish. Check colour, sheen, feel and cleaning behaviour. Products that look similar in the tin can behave differently on the same wood, particularly at end grain and cut edges.
Follow the product instructions for preparation, compatibility, application, ventilation and curing. Use suitable dust controls for sanding. Keep cushions and bedding out of the work area, and do not sleep in a van that is still being coated or is not ready for occupancy under the finish manufacturer's guidance.
Do not use a decorative coating as a substitute for a complete waterproof system in a wet room. Areas around heating equipment, cooking appliances and required ventilation also retain their own material and clearance requirements.
Protect the surfaces that get regular wear: entrances, frequently handled edges and the places where removable furniture rests. A finish that can be maintained or touched up sensibly is more useful than one that is beautiful only while untouched.
4. Fit curtains or blinds that work with the window
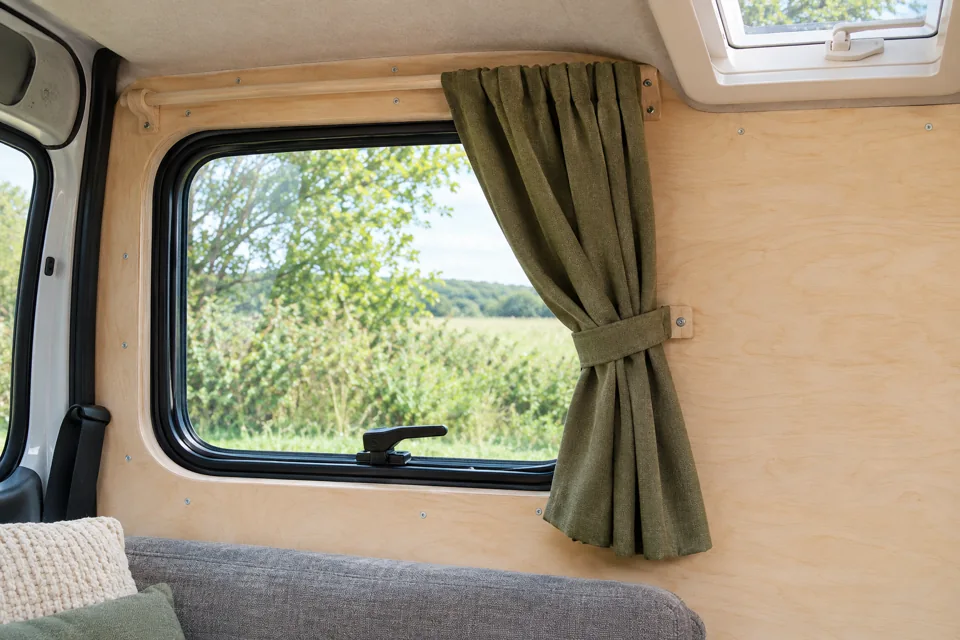
Start with privacy and access. Decide whether a curtain, blind or removable insulated cover suits each window. Measure the actual opening and the surrounding fittings; allow for the curtain stack, rail ends, handles and the blind's complete casing.
Choose a fixing method compatible with the lining and vehicle guidance. Ask the supplier about the suitability and relevant material information for the intended use. Keep coverings away from heat sources and follow the appliance instructions rather than relying on a guessed gap.
Open the window fully with the covering fitted. Check that tie-backs cannot trap the handle or interfere with a door. Do not cover required vents or make an emergency exit harder to operate.
Removable covers can be handy, but plan somewhere to stow them when wet or not in use. Inspect around windows for condensation and deal with leaks or persistent dampness. A cover is not a repair or a replacement for proper ventilation.
5. Put small fittings where the job happens
Try hook and handle positions with temporary paper markers while parked. Reach for a towel from the washing area, hang a coat without blocking the door and check a cupboard handle against your knee when seated. Keep the number of fittings modest until you know what is missing.
Select fixings for the material and the expected use. An adhesive hook's label does not establish that it will hold on carpet, a textured panel or a damp surface. Follow its preparation, curing and loading instructions. Do not use small accessory fittings to restrain heavy objects for travel.
Check catches again after handles and trim are fitted. A drawer that closes correctly when empty can bind after a handle screw protrudes inside or a basket is added. Review storage closures and contents restraint as a complete arrangement.
Give essential controls clear, durable labels where useful. Identify the relevant switch or isolation point using the installer's agreed terminology. A simple label is better than relying on everyone remembering which identical switch does what.
6. Do a final check for access, airflow and loose objects
With the van packed normally, reach the service panels and controls. Required vents, appliance air paths and safety equipment must stay accessible. Do not let a new cushion, curtain or trim turn a previously clear opening into blocked ventilation.
Check loose decorations and table-top items. Find a secure travel home for mugs, plants, books and removable covers. Photos of a parked interior may show attractive objects that should be stowed before driving.
Photograph the finished removable panels and put the pictures with your hidden-route records. Mark what is behind each access cover and keep the appropriate tool available. Keep material and hardware details so you can match a replacement later.
Time and budget: stop when it works well
Group the finishing list into trims, surface products, window coverings, handles and small fittings. Reuse suitable offcuts for test pieces and short trims. Confirm complete costs, including rails, brackets, end stops, fixings and any fabric work.
For an invented planning example, £35 for trims, £45 for surface products, £70 for coverings and £25 for small fittings totals £175 before tools or labour. These are arithmetic allowances, not checked prices or a complete quote. Record the actual purchases once and avoid duplicating handles already counted with the cabinets.
Allow for preparation and curing as well as fitting time. You can take a simple, properly checked van on its first trip without every decorative detail being complete. Keep an optional improvements list instead of continually adding cost and weight before you have used the van.
Your finishing checklist
- Sharp edges, leaks, loose parts and other unresolved faults have been addressed.
- Trims fit without fouling doors, latches, handles or access openings.
- Hidden services and vehicle restrictions were checked before fixing.
- Finishes are compatible, cured and ready for occupancy.
- Curtains and blinds leave window operation, exits and required ventilation usable.
- Controls and service points remain accessible and understandable.
- Loose decorative objects have an appropriate travel storage arrangement.
- Removable panels and material details are recorded.
- Optional decoration has not displaced the budget for checks and necessary work.
Instructions and further reading
Original CamperSteps writing and illustrations. Use current instructions for the actual coatings, trims, coverings and fittings. The pictures show appearance and planning ideas, not heat clearances or approved fixing locations.
- Ford Pro conversion resources—obtain the relevant guidance for your own make, model and year.
- HSE: dust control when cutting and sanding wood.
References checked 2 November 2026. Cost examples are invented editorial allowances. Saved plans and equipment prices are unchanged.